Setup APC (Alternative PHP Cache) on Dreamhost Shared Hosting
If you use Dreamhost as your hosting provider, and more specifically, use their shared hosting service, you may notice that PHP performance is less than ideal. Luckily, Dreamhost gives one possible option to increase performance: installing and configuring APC (Alternative PHP Cache).
Before we begin, please note this is for advanced users only. You must meet these requirements to complete the install:
- An active Dreamhost account
- A user setup for shell access
- A domain running PHP 5.3 on FastCGI
- A terminal/shell application to connect to your account via SSH
These are the steps to install and configure APC:
- Login through your terminal application
Run the following script:
# Navigate to your home directory (should already be there, but just in case)
cd ~/

# Create a folder to download the latest stable version of APC
mkdir download
cd download

# Download the latest version of APC (3.19 as of this post) http://pecl.php.net/package/APC
wget http://pecl.php.net/get/APC-3.1.9.tgz

# Unpack the downloaded tarball and navigate into it:
tar xvf APC-3.1.9.tgz
cd APC-3.1.9

# phpize the source
/usr/local/php53/bin/phpize

# configure and make the source
./configure --with-php-config=/usr/local/php53/bin/php-config; make

# create a directory to copy the finished module into
mkdir -p ~/.php/modules

# copy the compiled module
cp modules/apc.so ~/.php/modules/apc.so

# Create a directory for a custom php config
mkdir -p ~/.php/5.3

# Add the module to the custom PHP config
echo extension = ~/.php/modules/apc.so >> ~/.php/5.3/phprc

# Open phprc for editing (be sure to hit enter if the following command doesn't run)
nano ~/.php/5.3/phprc
Paste the following after the extension line (be sure to edit apc.filters with the path to your webroot):
[APC]
extension = apc.so
apc.enabled = 1
apc.shm_segments = 1
apc.shm_size = 32M
apc.optimization = 0
apc.num_files_hint = 512
apc.user_entries_hint = 1024
apc.ttl = 0
apc.user_ttl = 0
apc.gc_ttl = 600
apc.cache_by_default = 0
apc.filters = "-/home/yourusername/yourwebsite.com/apc.php$"
apc.slam_defense = 0
apc.use_request_time = 1
apc.mmap_file_mask = /tmp/apc-accountname.XXXXXX ;OR apc.mmap_file_mask = /dev/zero
apc.file_update_protection = 2
apc.enable_cli = 0
apc.max_file_size = 2M
apc.stat = 1
apc.write_lock = 1
apc.report_autofilter = 0
apc.include_once_override = 0
apc.rfc1867 = 0
apc.rfc1867_prefix = "upload_"
apc.rfc1867_name = "APC_UPLOAD_PROGRESS"
apc.rfc1867_freq = 0
apc.localcache = 1
apc.localcache.size = 512
apc.coredump_unmap = 0
apc.stat_ctime = 0
Hit Ctrl+O then enter to save your file, followed by Ctrl+X to exit nano
- Copy apc.php into your webroot so you can see the status of your install:
cp ~/download/APC-3.1.9/apc.php ~/yourwebsite.com/apc.php - Open top:
top Once top is open, check to see if php53.cgi (or similar) process is running; if it is, you'll have to kill them. Hit "q" to exit top, then run the following command:

killall php53.cgiRun that command a few times until you receive a "php53.cgi: no process found" message.
Navigate to yourwebsite.com/apc.php to see the status of APC:
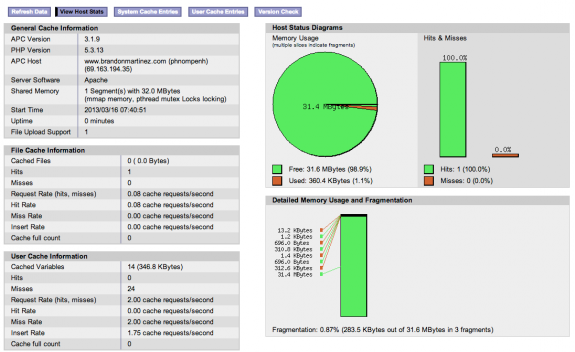 Ideally, your fragmentation should be under 50%.
If all looks well, remove the apc.php file from your site: `
bash rm ~/yourwebsite.com/apc.phpDone!

There are many benefits to using APC, especially when you use it in conjunction with applications like WordPress. In my next post, I'll show you how to configure WordPress and W3 Total Cache to get the best performance from your WordPress application on Dreamhost shared hosting.
References
- Hacking the Valley: WordPress Tuneup for Shared Hosting: PHP APC and WP Super Cache
- Chris Gilligan: How to Configure APC Cache on Virtual Servers with PHP running under FCGId
- Greg Rickaby: The Perfect APC Configuration